Roll dice application tutorial
In this tutorial we are going to create a simple roll dice application for Android, IOS and Desktop. The user is prompted to choose whether to roll one or two dices.
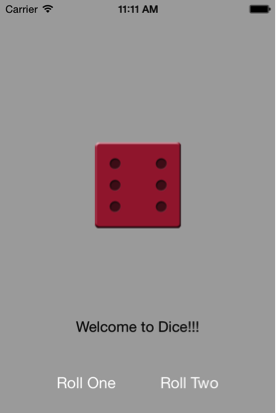
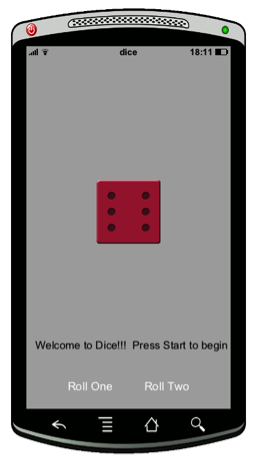
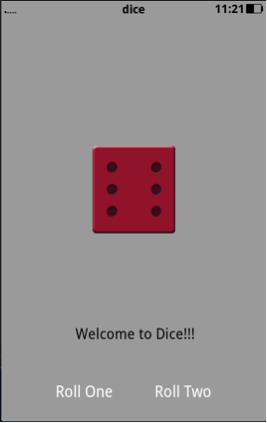
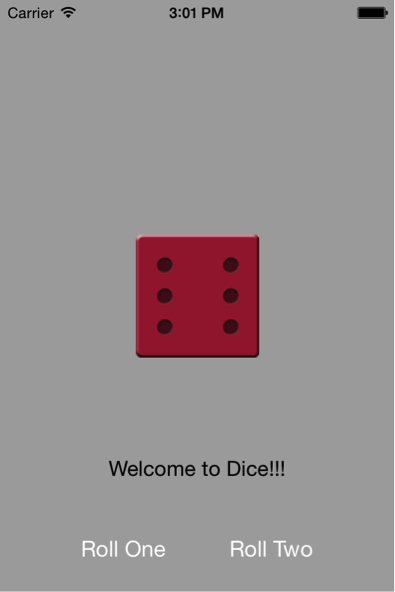
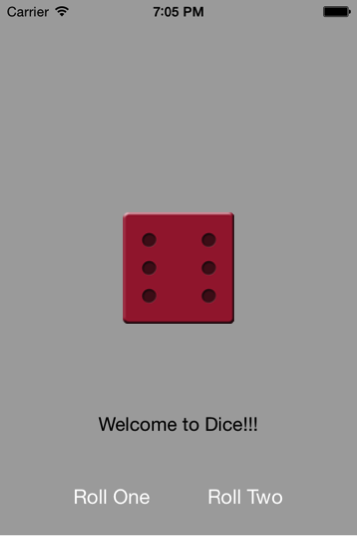
The following instance shows app’s first view on all three devices.
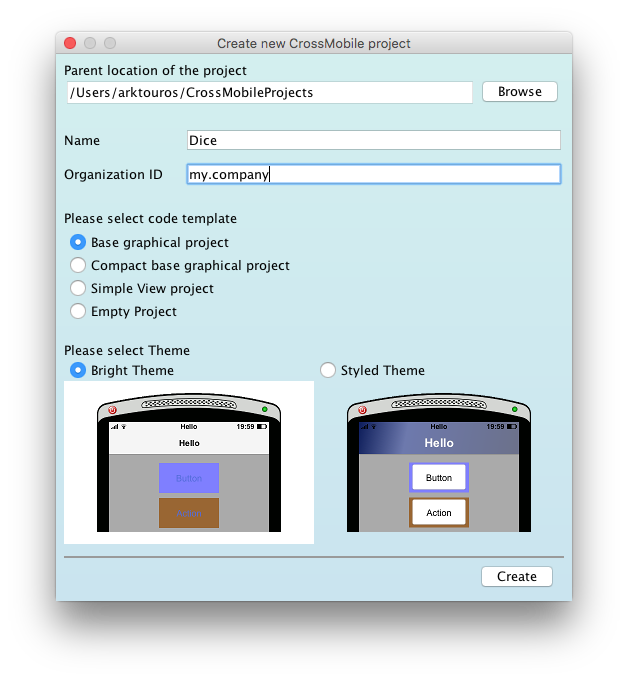
1.Create a new project
To create a new project press the new project button.
Let’s name this project Dice.
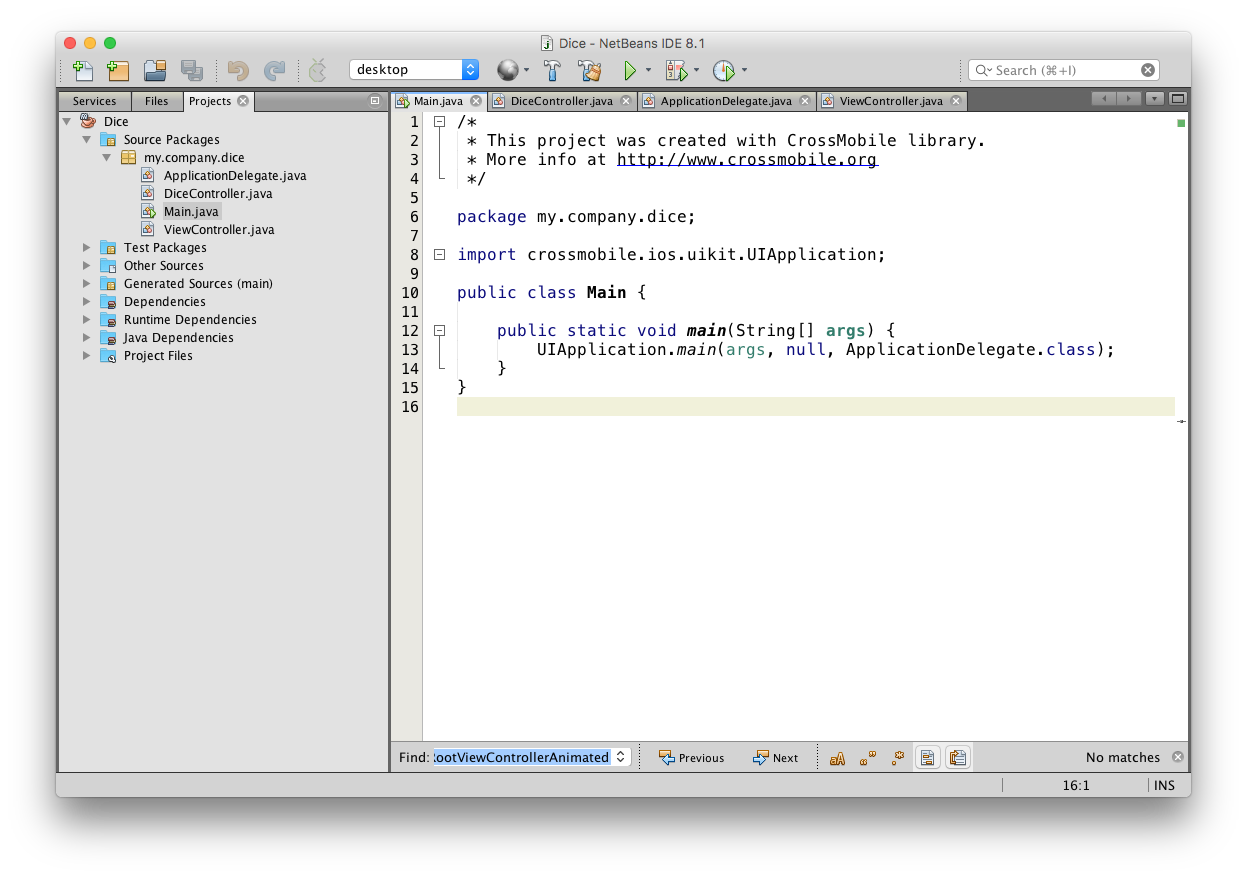
Then press Code button to open your new project with NetBeans. As our first HelloWorld project each CrossMobile project has the basic three files Main.java, ApplicationDelegate.java and ViewController.java.
2.Creating the first view
First we are going to edit our ViewController.java .
 5public class ViewController extends UIViewController {
 6
 7    @Override
 8    public void loadView() {
 9        UIView mainView = new UIView();
10        mainView.setBackgroundColor(UIColor.whiteColor());
11
12        UILabel title = new UILabel(new CGRect(0, 390, 320, 40));
13        title.setText("Hello World!");
14        title.setTextAlignment(UITextAlignment.Center);
15
16        UIImageView img = new UIImageView(new CGRect(75, 80, 170, 220));
17        img.setImage(UIImage.imageNamed("logo.png"));
18
19        mainView.addSubview(title);
20        mainView.addSubview(img);
21
22        setView(mainView);
23    }
24}
And delete everything between lines 11 and 21. And change the background color from white to light gray as the code that follows:
 5public class ViewController extends UIViewController {
 6
 7    @Override
 8    public void loadView() {
 9        UIView mainView = new UIView();
10        mainView.setBackgroundColor(UIColor.lightGrayColor());
11
12        setView(mainView);
13    }
14}
Here we will add the objects needed to create our first View.
First we will add a Label. To initialize a UILabel Object we need to set its placement on the View. Since we are compiling for multiple platforms and devices it is better to have relative placement. For that reason in lines 3 and 4 we create two floats dheight and dwidth which when the application runs calculates screen’s height and width.
In line 11 we initialize our UILabel with:
11UILabel label = new UILabel(new CGRect(0, dheight-120, dWidth, 40));The UILabel Constructor takes a CGRect as parameter.
CGRect takes four integers to initialize these four integers specify a rectangular space on the screen. The first two integers specify the rectangles’ position (the first one is distance from the left and the second distance from top) and the last two parameters rectangle’s width and height.
So in order to place a simple label on the top – left of the screen we use the following declaration:
12UILabel label = new UILabel(new CGRect(0, 0, 320, 40));The first parameter defines the label’s distance from the left, which is 0. The second one set label’s distance from the top again 0. The last two set label’s width and height to be 320px wide and 40px respectively.
So in our case we place a UILabel in a rectangle 0 distance from the left side, 120 from the bottom, full width, and 40 tall.
Next we need to put some text in our UILabel, for that we use the setText() method.
13label.setText("Welcome to Dice!!!");We also need to set the text alignment .so the text will appear on the center an background color to clear color. We don’t want our rectangle to have different background color than the rest of the screen.
And finally we add the UILabel to the main view. (Every time you add a new component you have to add it to the view otherwise it will not appear on the screen)
14mainView.addSubview(label);3.Adding the Buttons
Let’s add the two buttons. Add the code below right after the UILabel. This code adds two buttons at the bottom of the screen.
37        UIButton oneBTN = UIButton.buttonWithType(UIButtonType.Custom);
38        oneBTN.setFrame(new CGRect(50, dheight - 60, 100, 50));
39        oneBTN.setTitle("Roll One", UIControlState.Normal);
40        oneBTN.setBackgroundColor(UIColor.clearColor());
41        oneBTN.setTitleColor(UIColor.darkGrayColor(), UIControlState.Highlighted);
42        oneBTN.addTarget(
43                new UIControlDelegate() {
44                    @Override
45                    public void exec(UIControl uiControl, UIEvent uiEvent) {
46                        //Here We will implement the code to go to the next page
47                    }
48                }
49                , UIControlEvents.TouchUpInside);
50
51        UIButton twoBTN = UIButton.buttonWithType(UIButtonType.Custom);
52        twoBTN.setFrame(new CGRect(dWidth - 150, dheight - 60, 100, 50));
53        twoBTN.setTitle("Roll Two", UIControlState.Normal);
54        twoBTN.setBackgroundColor(UIColor.clearColor());
55        twoBTN.setTitleColor(UIColor.darkGrayColor(), UIControlState.Highlighted);
56        twoBTN.addTarget(
57                new UIControlDelegate() {
58                    @Override
59                    public void exec(UIControl uiControl, UIEvent uiEvent) {
60                        //Here We will implement the code to go to the next page
61                    }
62                }
63                , UIControlEvents.TouchUpInside);
UIButton is not initialized with a constructor. Instead we use a method in order to initialize it. So we use the following declaration:
UIButton.buttonWithType(UIButtonType.Custom);Next we set the frame of the button again with the following method:
oneBTN.setFrame(new CGRect(50, dheight - 60, 100, 50));The we add the text displayed on the button:
oneBTN.setTitle("Roll One", UIControlState.Normal);Also we want to set the button’s background color to clear: oneBTN.setBackgroundColor(UIColor. clearColor());
oneBTN.setBackgroundColor(UIColor. clearColor());When the button is pressed we want to see a change. For this reason we have to define a color change and this is accomplished by setting it’s state to be altered from Normal to Highlighted(While Pressed):
oneBTN.setTitleColor(UIColor.darkGrayColor(), UIControlState.Highlighted);To implement our apps behavior when the button is pressed, we use the addTarget() method.
The method addTarget is inherited from UIControl so it is not explicit to UIButton and is used like this:
oneBTN.addTarget(
        new UIControlDelegate() {
            @Override
            public void exec(UIControl uiControl, UIEvent uiEvent) {
                //Here We will implement the code to go to the next page
            }
        }
        , UIControlEvents.TouchUpInside);
UIControlDelegate is an abstract class we implement to handle our events. In this case the event we set is UIControlEvents.TouchUpInside. (For more Events see Documentation)
We will implement the code to go to the next page after we create it in the next section.
Don’t forget to add the Buttons to the main View!!!
4.Adding a UIImageView
First you need to download the dice images from here ( Dice ).
Extract the contents dice.zip into the artwork subfolder of your project. It contains six png images of all dice sides (from 1 to 6).
Now add the code bellow after the buttons to add the dice image to your main View.
        UIImageView img = new UIImageView(new CGRect(dWidth / 2 - 50, dheight / 2 - 50, 100, 100));
        img.setImage(UIImage.imageNamed(6 + ".png"));
        img.setBackgroundColor(UIColor.clearColor());

        mainView.addSubview(img);
UIImageView initializes with a CGRect instance too. In our example the following command places a 100×100 rectangle in the middle of the screen.
new CGRect(dWidth / 2 - 50, dheight / 2 - 50, 100, 100));In order to set the image we use:
img.setImage(UIImage.imageNamed(6 + ".png"));If you want to change the dice displayed in the first view just change 6 to another number from 1-6.
The imageNamed method looks into the application recourses directory (artwork by default).
We set the background color to clear so it will not be visible on the dice’s edges.
And finally we add it to the main view (never forget to….).
5.Adding a second view controller.
To add a second UIViewController we first need to add a UINavigationController.
To do that go to ApplicationDelegate.java file and we add a UINavigationController and initialize it with ViewController(), set the navigation bar as hidden and set indexPage as root view controller instead of a new ViewController(). (lines 10-12)
public class ApplicationDelegate implements UIApplicationDelegate {

    private UIWindow window;

    @Override
    public boolean didFinishLaunchingWithOptions(UIApplication app, Map<String, Object> launchOptions) {
        window = new UIWindow(UIScreen.mainScreen().bounds());

            //Page navigation
        UINavigationController indexPage;
        indexPage = new UINavigationController(new ViewController());
        indexPage.setNavigationBarHidden(true);

        window.setRootViewController(indexPage);
        window.makeKeyAndVisible();
        return true;
    }
}
A UINavigationController allows navigating through different UIViewControllers. The view controllers are added to the navigation controller as a stack. So the users of our application see the last UIViewController added to the stack. In order to view the previous controller we have to pop the last UIViewControler from the stack.
If you want to view one in the middle of the stack you have to pop UIViewControllers until you reach it, the same goes for the root controller. To add a UIViewController you push it into the stack.
Now add a new class to the package named DiceController, open it and add extends UIViewController to the class declaration
public class DiceController extends UIViewController{

    @Override
    public void loadView() {

    }
}
Since we want this to work for either one or two dice, we will add a constructor that takes an integer as parameter to specify the number of dice.
public class DiceController extends UIViewController{

    private final int numberOfDice;

    DiceController(int numberOfDice) {
        this.numberOfDice = numberOfDice;
    }

    @Override
    public void loadView() {

    }
}
6.Adding the buttons.
Now in order to start populating this view controller, we will add a main view and two buttons, one to roll the dice and one to go back to the main view.
public class DiceController extends UIViewController {

    private final int numberOfDice;
    private UIView mainView;
    float dheight = UIScreen.mainScreen().bounds().size.height;
    float dWidth = UIScreen.mainScreen().bounds().size.width;

    DiceController(int numberOfDice) {
        this.numberOfDice = numberOfDice;
    }

    @Override
    public void loadView() {
        mainView = new UIView();
        mainView.setBackgroundColor(UIColor.lightGrayColor());

        // Button BACK
        UIButton backBTN = UIButton.buttonWithType(UIButtonType.Custom);
        backBTN.setFrame(new CGRect(10, 10, 60, 50));
        backBTN.setTitle("<-Back", UIControlState.Normal);
        backBTN.setBackgroundColor(UIColor.lightGrayColor());
        backBTN.setTitleColor(UIColor.darkGrayColor(), UIControlState.Highlighted);
        backBTN.addTarget(new UIControlDelegate() {

            @Override
            public void exec(UIControl arg0, UIEvent arg1) {
               //Here We will implement the code below

            }
        }, UIControlEvents.TouchUpInside);

        //Button Roll
        UIButton rollBTN = UIButton.buttonWithType(UIButtonType.Custom);
        rollBTN.setFrame(new CGRect(dWidth / 2 - 100, dheight - 100, 200, 50));
        rollBTN.setTitle("ROLL", UIControlState.Normal);
        rollBTN.setBackgroundColor(UIColor.lightGrayColor());
        rollBTN.setTitleColor(UIColor.darkGrayColor(), UIControlState.Highlighted);
        rollBTN.addTarget(new UIControlDelegate() {
            @Override
            public void exec(UIControl uic, UIEvent i) {
                rollDice(numberOfDice);

            }

        }, UIControlEvents.TouchUpInside);

        mainView.addSubview(backBTN);
        mainView.addSubview(rollBTN);
        setView(mainView);
        }
    }
This time we make mainView a field (line 4) instead of a local variable because we are going to need it in some functions.
The next step is to implement the navigation back and forth view controllers. To do that, we will push DiceCcontroller for ViewController and pop to root Controller from DiceController.
To access the navigation controller we use navigationController method.
We add navigationController().pushViewController(new DiceController(1), true) to the public void exec(UIControl uic, UIEvent i) method in ViewController.java (the part that we left as comment lines 31 and 47), using the appropriate parameter for the DiceController (1 for one dice and 2 for two).
        //Button
        UIButton oneBTN = UIButton.buttonWithType(UIButtonType.Custom);
        oneBTN.setFrame(new CGRect(50, dheight - 60, 100, 50));
        oneBTN.setTitle("Roll One", UIControlState.Normal);
        oneBTN.setBackgroundColor(UIColor.clearColor());
        oneBTN.setTitleColor(UIColor.darkGrayColor(), UIControlState.Highlighted);

        oneBTN.addTarget(new UIControlDelegate() {

            @Override
            public void exec(UIControl uic, UIEvent i) {

                navigationController().pushViewController(new DiceController(1), true);
            }
        }, UIControlEvents.TouchUpInside);

        UIButton twoBTN = UIButton.buttonWithType(UIButtonType.Custom);
        twoBTN.setFrame(new CGRect(dWidth - 150, dheight - 60, 100, 50));
        twoBTN.setTitle("Roll Two", UIControlState.Normal);
        twoBTN.setBackgroundColor(UIColor.clearColor());
        twoBTN.setTitleColor(UIColor.darkGrayColor(), UIControlState.Highlighted);
        twoBTN.addTarget(new UIControlDelegate() {

            @Override
            public void exec(UIControl uic, UIEvent i) {

                navigationController().pushViewController(new DiceController(2), true);
            }
        }, UIControlEvents.TouchUpInside);
To go back to the mainview we can’t create a new instance of it, since it already exists. So we use navigationController() popToRootViewControllerAnimated(true) where the value true in both pop and push sets the transition to be animated.
        // Button BACK
        UIButton backBTN = UIButton.buttonWithType(UIButtonType.Custom);
        backBTN.setFrame(new CGRect(10, 10, 60, 50));
        backBTN.setTitle("<-Back", UIControlState.Normal);
        backBTN.setBackgroundColor(UIColor.lightGrayColor());
        backBTN.setTitleColor(UIColor.darkGrayColor(), UIControlState.Highlighted);
        backBTN.addTarget(new UIControlDelegate() {

            @Override
            public void exec(UIControl arg0, UIEvent arg1) {
               navigationController().popToRootViewControllerAnimated(true);

            }
        }, UIControlEvents.TouchUpInside);
7.Adding the dice
We are going to add the dice to a hashmap in order to make easier accessible later. Add a field to the class:
HashMap<Integer, UIImage> diceImageList = new HashMap();Since we are going to use either one or two dice, we have to create either one or two image views too.
We are going to create an ArrayList to hold these UIImageViews so we can access them. In that way it will be easier to extend it to more dice in the future. To do that we add one more field:
List dice = new ArrayList();First we populate the diceImagelist at the top of the loadView method:
@Override
public void loadView() {

    mainView = new UIView();
    mainView.setBackgroundColor(UIColor.lightGrayColor());

    for (int i = 1; i <= 6; i++) {
        diceImageList.put(i, UIImage.imageNamed(i + ".png"));
    }
To add the UIImageViews (or UIImageView) on the main View we will create a private method
addDiceToView(int numberOfDice), the method will take as parameter the number of dice and create the views accordingly.
private void addDiceToView(int numberOfDice) {

    if (numberOfDice == 1) {
        dice.add(new UIImageView(new CGRect(dWidth / 2 - 50, dheight / 2 - 50, 100, 100)));
        dice.get(0).setImage(diceImageList.get(1));
        dice.get(0).setBackgroundColor(UIColor.clearColor());
        mainView.addSubview(dice.get(0));
    } else if (numberOfDice == 2) {
        dice.add(new UIImageView(new CGRect(dWidth / 2 - 115, dheight / 2 - 50, 100, 100)));
        dice.get(0).setImage(diceImageList.get(1));
        dice.get(0).setBackgroundColor(UIColor.clearColor());
        mainView.addSubview(dice.get(0));
        dice.add(new UIImageView(new CGRect(dWidth / 2 + 15, dheight / 2 - 50, 100, 100)));
        dice.get(1).setImage(diceImageList.get(1));
        dice.get(1).setBackgroundColor(UIColor.clearColor());
        mainView.addSubview(dice.get(1));
    }
}
Notice the change in CGRect so the dice will be centered.
Now we can call the function in the loadView method so that it will be loaded on the screen.
@Override
public void loadView() {

    mainView = new UIView();
    mainView.setBackgroundColor(UIColor.lightGrayColor());

    for (int i = 1; i <= 6; i++) {
        diceImageList.put(i, UIImage.imageNamed(i + ".png"));
    }

    addDiceToView(numberOfDice);
8.Rolling the Dice
To roll the dice we need a function to return a random number between 1 and 6, for that we will use Java’s class Math.Random. We will add one more field for random and initialize it in the constructor
Random random;

DiceController(int numberOfDice) {
    this.numberOfDice = numberOfDice;
    random = new Random();
}
And we will create a method to return a random number between 1 and six to use whenever we want.
private int getSide() {
    return random.nextInt(6) + 1;
}
And then we will add it to the class. Now to roll the dice we only have to implement the exec method for the roll button
rollBTN.addTarget(new UIControlDelegate() {
    @Override
    public void exec(UIControl uic, UIEvent i) {
        rollDice(numberOfDice);
    }

    private void rollDice(int numberOfDice) {

        switch (numberOfDice) {
            case 1:
                dice.get(0).setImage(diceImageList.get(getSide()));
                break;
            case 2:
                dice.get(0).setImage(diceImageList.get(getSide()));
                dice.get(1).setImage(diceImageList.get(getSide()));
                break;
        }

    }
}, UIControlEvents.TouchUpInside);
We add a method in the Delegate to set the dice to the new values and we call it from inside the exec method.
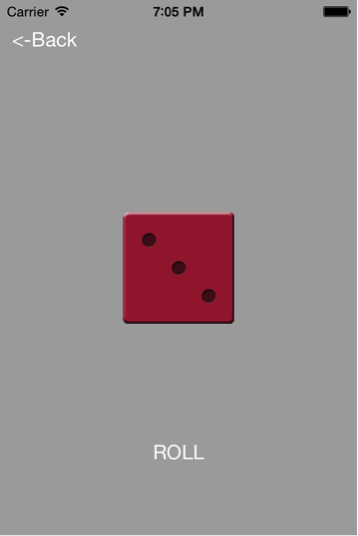
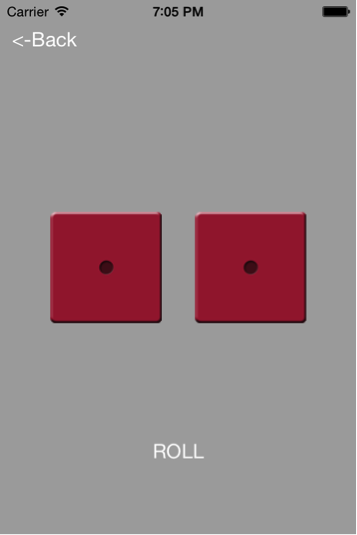
9.The final result is:
10.The whole Code:
Main.java
 1/*
 2 * This project was created with CrossMobile library.
 3 * More info at http://www.crossmobile.org
 4 */
 5
 6package my.company.dice;
 7
 8import crossmobile.ios.uikit.UIApplication;
 9
10public class Main {
11
12    public static void main(String[] args) {
13        UIApplication.main(args, null, ApplicationDelegate.class);
14    }
15}
ApplicationDelegate.java
 1/*
 2 * This project was created with CrossMobile library.
 3 * More info at http://www.crossmobile.org
 4 */
 5
 6package my.company.dice;
 7
 8import crossmobile.ios.uikit.UIApplication;
 9import crossmobile.ios.uikit.UIApplicationDelegate;
10import crossmobile.ios.uikit.UINavigationController;
11import crossmobile.ios.uikit.UIScreen;
12import crossmobile.ios.uikit.UIWindow;
13import java.util.Map;
14
15public class ApplicationDelegate implements UIApplicationDelegate {
16
17    private UIWindow window;
18
19    @Override
20    public boolean didFinishLaunchingWithOptions(UIApplication app, Map<String, Object> launchOptions) {
21        window = new UIWindow(UIScreen.mainScreen().bounds());
22
23            //Page navigation
24        UINavigationController indexPage;
25        indexPage = new UINavigationController(new ViewController());
26        indexPage.setNavigationBarHidden(true);
27
28        window.setRootViewController(indexPage);
29        window.makeKeyAndVisible();
30        return true;
31    }
32}
ViewController.java
 1/*
 2 * This project was created with CrossMobile library.
 3 * More info at http://www.crossmobile.org
 4 */
 5
 6package my.company.dice;
 7
 8import crossmobile.ios.coregraphics.CGRect;
 9import crossmobile.ios.uikit.UIButton;
10import crossmobile.ios.uikit.UIButtonType;
11import crossmobile.ios.uikit.UIColor;
12import crossmobile.ios.uikit.UIControl;
13import crossmobile.ios.uikit.UIControlDelegate;
14import crossmobile.ios.uikit.UIControlEvents;
15import crossmobile.ios.uikit.UIControlState;
16import crossmobile.ios.uikit.UIEvent;
17import crossmobile.ios.uikit.UIImage;
18import crossmobile.ios.uikit.UIImageView;
19import crossmobile.ios.uikit.UILabel;
20import crossmobile.ios.uikit.UIScreen;
21import crossmobile.ios.uikit.UITextAlignment;
22import crossmobile.ios.uikit.UIView;
23import crossmobile.ios.uikit.UIViewController;
24
25public class ViewController extends UIViewController {
26
27    float dheight = UIScreen.mainScreen().bounds().size.height;
28    float dWidth = UIScreen.mainScreen().bounds().size.width;
29
30    @Override
31    public void loadView() {
32        UIView mainView = new UIView();
33        mainView.setBackgroundColor(UIColor.lightGrayColor());
34
35        UILabel title = new UILabel(new CGRect(0, dheight - 120, dWidth, 40));
36        title.setText("Welcome to Dice!!!");
37        title.setTextAlignment(UITextAlignment.Center);
38        title.setBackgroundColor(UIColor.clearColor());
39
40        //Button
41        UIButton oneBTN = UIButton.buttonWithType(UIButtonType.Custom);
42        oneBTN.setFrame(new CGRect(50, dheight - 60, 100, 50));
43        oneBTN.setTitle("Roll One", UIControlState.Normal);
44        oneBTN.setBackgroundColor(UIColor.clearColor());
45        oneBTN.setTitleColor(UIColor.darkGrayColor(), UIControlState.Highlighted);
46
47        oneBTN.addTarget(new UIControlDelegate() {
48
49            @Override
50            public void exec(UIControl uic, UIEvent i) {
51
52                navigationController().pushViewController(new DiceController(1), true);
53            }
54        }, UIControlEvents.TouchUpInside);
55
56        UIButton twoBTN = UIButton.buttonWithType(UIButtonType.Custom);
57        twoBTN.setFrame(new CGRect(dWidth - 150, dheight - 60, 100, 50));
58        twoBTN.setTitle("Roll Two", UIControlState.Normal);
59        twoBTN.setBackgroundColor(UIColor.clearColor());
60        twoBTN.setTitleColor(UIColor.darkGrayColor(), UIControlState.Highlighted);
61        twoBTN.addTarget(new UIControlDelegate() {
62
63            @Override
64            public void exec(UIControl uic, UIEvent i) {
65
66                navigationController().pushViewController(new DiceController(2), true);
67            }
68        }, UIControlEvents.TouchUpInside);
69
70        UIImageView img = new UIImageView(new CGRect(dWidth / 2 - 50, dheight / 2 - 50, 100, 100));
71        img.setImage(UIImage.imageNamed(6 + ".png"));
72        img.setBackgroundColor(UIColor.clearColor());
73
74        mainView.addSubview(img);
75
76        mainView.addSubview(oneBTN);
77        mainView.addSubview(twoBTN);
78
79        mainView.addSubview(title);
80
81        setView(mainView);
82    }
83}
DiceController.java
  1/*
  2 * To change this license header, choose License Headers in Project Properties.
  3 * To change this template file, choose Tools | Templates
  4 * and open the template in the editor.
  5 */
  6package my.company.dice;
  7import crossmobile.ios.coregraphics.CGRect;
  8import crossmobile.ios.uikit.UIButton;
  9import crossmobile.ios.uikit.UIButtonType;
 10import crossmobile.ios.uikit.UIColor;
 11import crossmobile.ios.uikit.UIControl;
 12import crossmobile.ios.uikit.UIControlDelegate;
 13import crossmobile.ios.uikit.UIControlEvents;
 14import crossmobile.ios.uikit.UIControlState;
 15import crossmobile.ios.uikit.UIEvent;
 16import crossmobile.ios.uikit.UIImage;
 17import crossmobile.ios.uikit.UIImageView;
 18import crossmobile.ios.uikit.UIScreen;
 19import crossmobile.ios.uikit.UIView;
 20import crossmobile.ios.uikit.UIViewController;
 21import java.util.ArrayList;
 22import java.util.HashMap;
 23import java.util.List;
 24import java.util.Random;
 25
 26public class DiceController extends UIViewController {
 27
 28    private final int numberOfDice;
 29    private UIView mainView;
 30    float dheight = UIScreen.mainScreen().bounds().size.height;
 31    float dWidth = UIScreen.mainScreen().bounds().size.width;
 32    HashMap<Integer, UIImage> diceImageList = new HashMap();
 33    List dice = new ArrayList();
 34
 35    DiceController(int numberOfDice) {
 36        this.numberOfDice = numberOfDice;
 37    }
 38
 39    @Override
 40
 41    public void loadView() {
 42        mainView = new UIView();
 43        mainView.setBackgroundColor(UIColor.lightGrayColor());
 44
 45        for (int i = 1; i <= 6; i++) {
 46            diceImageList.put(i, UIImage.imageNamed(i + ".png"));
 47        }
 48
 49        addDiceToView(numberOfDice);
 50
 51        // Button BACK
 52        UIButton backBTN = UIButton.buttonWithType(UIButtonType.Custom);
 53        backBTN.setFrame(new CGRect(10, 10, 60, 50));
 54        backBTN.setTitle("<-Back", UIControlState.Normal);
 55        backBTN.setBackgroundColor(UIColor.lightGrayColor());
 56        backBTN.setTitleColor(UIColor.darkGrayColor(), UIControlState.Highlighted);
 57        backBTN.addTarget(new UIControlDelegate() {
 58            @Override
 59            public void exec(UIControl arg0, UIEvent arg1) {
 60                navigationController().popToRootViewControllerAnimated(true);
 61            }
 62        }, UIControlEvents.TouchUpInside);
 63
 64        //Button Roll
 65        UIButton rollBTN = UIButton.buttonWithType(UIButtonType.Custom);
 66        rollBTN.setFrame(new CGRect(dWidth / 2 - 100, dheight - 100, 200, 50));
 67        rollBTN.setTitle("ROLL", UIControlState.Normal);
 68        rollBTN.setBackgroundColor(UIColor.lightGrayColor());
 69        rollBTN.setTitleColor(UIColor.darkGrayColor(), UIControlState.Highlighted);
 70        rollBTN.addTarget(new UIControlDelegate() {
 71            @Override
 72            public void exec(UIControl uic, UIEvent i) {
 73                rollDice(numberOfDice);
 74            }
 75
 76            private void rollDice(int numberOfDice) {
 77                switch (numberOfDice) {
 78                    case 1:
 79                        dice.get(0).setImage(diceImageList.get(getSide()));
 80                        break;
 81                    case 2:
 82                        dice.get(0).setImage(diceImageList.get(getSide()));
 83                        dice.get(1).setImage(diceImageList.get(getSide()));
 84                        break;
 85                }
 86            }
 87        }, UIControlEvents.TouchUpInside);
 88
 89        mainView.addSubview(backBTN);
 90        mainView.addSubview(rollBTN);
 91        setView(mainView);
 92    }
 93
 94    private int getSide() {
 95        Random rand = new Random();
 96        return rand.nextInt(6) + 1;
 97    }
 98
 99    private void addDiceToView(int numberOfDice) {
100
101        if (numberOfDice == 1) {
102            dice.add(new UIImageView(new CGRect(dWidth / 2 - 50, dheight / 2 - 50, 100, 100)));
103            dice.get(0).setImage(diceImageList.get(1));
104            dice.get(0).setBackgroundColor(UIColor.clearColor());
105            mainView.addSubview(dice.get(0));
106        } else if (numberOfDice == 2) {
107            dice.add(new UIImageView(new CGRect(dWidth / 2 - 115, dheight / 2 - 50, 100, 100)));
108            dice.get(0).setImage(diceImageList.get(1));
109            dice.get(0).setBackgroundColor(UIColor.clearColor());
110            mainView.addSubview(dice.get(0));
111            dice.add(new UIImageView(new CGRect(dWidth / 2 + 15, dheight / 2 - 50, 100, 100)));
112            dice.get(1).setImage(diceImageList.get(1));
113            dice.get(1).setBackgroundColor(UIColor.clearColor());
114            mainView.addSubview(dice.get(1));
115        }
116    }
117}