UIView Basic Tutorial
First of all, we need to introduce the fundamental concepts of application’s view architecture. We are going to present two basic classes the UIView class along with the related CGRect class (that is structure), that both are used in order to representation of an application.
The UIView class defines a rectangular area on the screen along with the necessary interface for managing the content in that area. Particularly we create a specific object that handles at runtime the content of this area along with the interactions relative to it. For example one basic function of the IView class is to fill the area with a background color.
Generally all UI elements are either subclasses of UIView or are contained within a UIView. By subclassing the UIView and implementing necessary drawing and event handling code you can provide more sophisticated content to your app’s users. Generally views follow the next principles:
- A view may contain zero or more subviews.
- Each view defines its own default resizing behavior in relation to its parent view.
- A view can define the size and position of its subviews as needed.
UIView
UIView’s default constructor creates a rectangular area at point (0,0) of the screen with 0 width and height.
UIView view = new UIView();
UIView’s basic properties and methods:
BackgroundColor: Specifies the view’s background color
- Getter: public UIColor backgroundColor()
- Setter: public void setBackgroundColor(UIColor background)
- Code:setBackgroundColor(UIColor.whiteColor());
Example:
view.setBackgroundColor(UIColor.colorWithRGBA(250, 0, 0, 0.8f));
Hidden: A Boolean value that determines whether the view is hidden.
- Getter: public boolean isHidden()
- Setter: public void setHidden(boolean hidden)
- Code: view1.setHidden(true);
Alpha: The view’s alpha value.
- Getter: public float alpha()
- Setter: public void setAlpha(float alpha)
- Code: view.setAlpha((0.5f);
setUserInteractionEnabled: A Boolean value that determines whether user events are ignored and removed from the event queue.
- Getter: public boolean isUserInteractionEnabled()
- Setter: public void setUserInteractionEnabled(boolean userInteaction)
- Code: view.setUserInteractionEnabled(true);
Transform: Specifies the transform applied to the receiver, relative to the center of its bounds.
- Getter: public CGAffineTransform transform()
- Setter: public void setTransform(CGAffineTransform transform)
- Code: view.setTransform(CGAffineTransform.makeRotation(1));Superview: The receiver’s superview (null if it has none)
- Getter: public UIView superview()
- Code: UIView parent = view1.superview()
Subviews: The receiver’s immediate subviews.
- Getter: public List
subviews() - Code: List
children = view1.subviews();
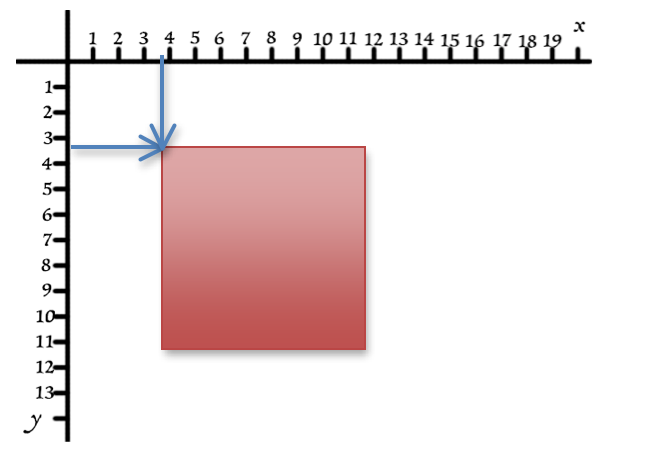
CGRect
CGRect is a structure that is generally used in order to represent the initial position and the size of a rectangle. The UIView uses CGRect supplementarily.
Constructor with CGRect frame as parameter:
UIView(CGRect frame)
CGRect takes four integers as parameters that specify a rectangular space on the screen. The first two integers determine the rectangles’ placement (the first one is distance from the left and the second distance from top) and the last two define rectangle’s width and height.
UIView constructor with CGRect frame as paremeter
Example:
UIView view = new UIView(new CGRect(0, 0, 320, 40));The following short applications are not extensively functional, so we are not going to use high level objects such as buttons, text fields, images etc. However, they give you the opportunity to see of how to place subviews on a main view and that will be useful later along with the examples that follow.
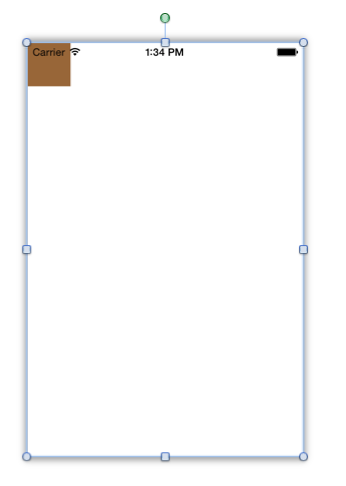
1.Placing a simple view on the main view.
As mentioned above almost every element that can be placed on the screen inherits UIView’s methods and initializes with a CGRect parameter describes a rectangle by its point of origin and its size. The point of origin is the first two integers in CGRect’s constructor and they describe the top left corner’s distance from its parent View. The last two integers describe its width and height respectively.
public void loadView() {
UIView mainView = new UIView();
mainView.setBackgroundColor(UIColor.whiteColor());
UIView view = new UIView(new CGRect(0, 0, 50, 50));
view.setBackgroundColor(UIColor.brownColor());
mainView.addSubview(view);
setView(mainView);
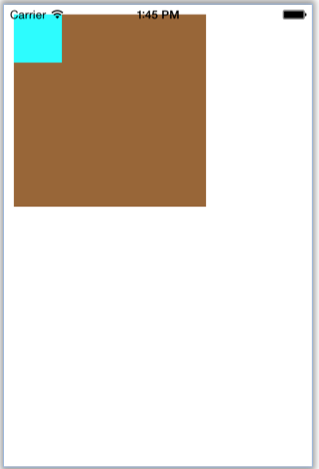
} As you can see in the above code (line 6) we place a rectangle that has 0px distance from the left side of the mainView (mainView covers the whole screen) has also 0px distance from top so it is placed at the left-top side of the screen. The rectangle is 50px width and 50px height. The result is the following:
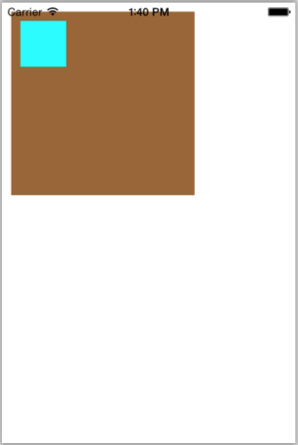
2.Placing a view inside another view (UIView-ception).
In this case we add view1 to view instead of mainView.
Notice that the point of origin is in reference to view and not
mainView. So the ViewController’s code is the following:
public class ViewController extends UIViewController {
    @Override
    public void loadView() {
        UIView mainView = new UIView();
        mainView.setBackgroundColor(UIColor.whiteColor());

        UIView view = new UIView(new CGRect(10, 10, 200, 200));
        view.setBackgroundColor(UIColor.brownColor());

        UIView view1 = new UIView(new CGRect(10, 10, 50, 50));
        view1.setBackgroundColor(UIColor.cyanColor());

        view.addSubview(view1);

        mainView.addSubview(view);

        setView(mainView);
    }
} 
If we add both views to mainView the will have the exact same point of origin.
public class ViewController extends UIViewController {
    @Override
    public void loadView() {
        UIView mainView = new UIView();
        mainView.setBackgroundColor(UIColor.whiteColor());

        UIView view = new UIView(new CGRect(10, 10, 200, 200));
        view.setBackgroundColor(UIColor.brownColor());

        UIView view1 = new UIView(new CGRect(10, 10, 50, 50));
        view1.setBackgroundColor(UIColor.cyanColor());

        mainView.addSubview(view);
        mainView.addSubview(view1);

        setView(mainView);
    }
} 
3.Placing UIViews on top of each other
public class ViewController extends UIViewController {
    @Override
    public void loadView() {
        UIView mainView = new UIView();
        mainView.setBackgroundColor(UIColor.whiteColor());

        UIView view = new UIView(new CGRect(10, 10, 200, 200));
        view.setBackgroundColor(UIColor.brownColor());

        UIView view1 = new UIView(new CGRect(100, 100, 200, 200));
        view1.setBackgroundColor(UIColor.cyanColor());

        mainView.addSubview(view);
        mainView.addSubview(view1);

        UIView view2 = new UIView(new CGRect(10, 250, 200, 200));
        view2.setBackgroundColor(UIColor.brownColor());

        UIView view3 = new UIView(new CGRect(100, 350, 200, 200));
        view3.setBackgroundColor(UIColor.cyanColor());

        mainView.addSubview(view3);
        mainView.addSubview(view2);

        setView(mainView);
    }
} 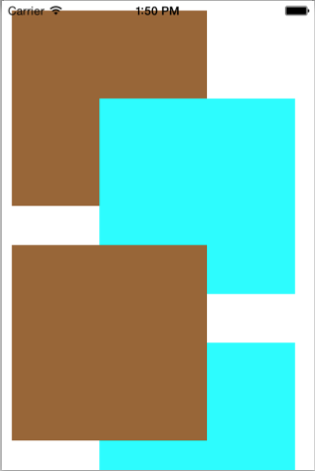
UIviews are added like a stack on top of each other. It doesn’t matter where in the code each view is initialized. What matters is the hierarchy of the added views. So the last added view is on top.
In the example above view2 is added last so it is viewed on top of view1 and view3, in spite of being initialized before view3.
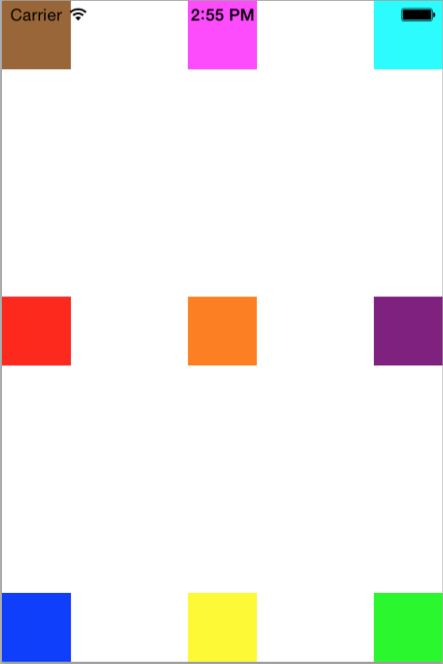
4.Dynamically specify point of origin.
CrossMobile is all about writing code once for multiple platforms and devices, so more often than not you will need to specify a views placement dynamically on the screen. To do that you have to take the phone dimensions inside the java code.
public class ViewController extends UIViewController {
    float dheight = UIScreen.mainScreen().bounds().size.height;
    float dWidth = UIScreen.mainScreen().bounds().size.width;

    @Override
    public void loadView() {
        UIView mainView = new UIView();
        mainView.setBackgroundColor(UIColor.whiteColor());

        UIView view = new UIView(new CGRect(0, 0, 50, 50));
        view.setBackgroundColor(UIColor.brownColor());

        UIView view1 = new UIView(new CGRect(dWidth - 50, 0, 50, 50));
        view1.setBackgroundColor(UIColor.cyanColor());

        UIView view2 = new UIView(new CGRect(0, dheight - 50, 50, 50));
        view2.setBackgroundColor(UIColor.blueColor());

        UIView view3 = new UIView(new CGRect(dWidth - 50, dheight - 50, 50, 50));
        view3.setBackgroundColor(UIColor.greenColor());

        UIView view4 = new UIView(new CGRect(dWidth/2 - 25, dheight/2 - 25, 50, 50));
        view4.setBackgroundColor(UIColor.orangeColor());

        UIView view5 = new UIView(new CGRect(dWidth/2 - 25, 0, 50, 50));
        view5.setBackgroundColor(UIColor.magentaColor());

        UIView view6 = new UIView(new CGRect(0, dheight/2 - 25, 50, 50));
        view6.setBackgroundColor(UIColor.redColor());

        UIView view7 = new UIView(new CGRect(dWidth - 50, dheight/2 - 25, 50, 50));
        view7.setBackgroundColor(UIColor.purpleColor());

        UIView view8 = new UIView(new CGRect(dWidth/2 - 25, dheight-50, 50, 50));
        view8.setBackgroundColor(UIColor.yellowColor());

        mainView.addSubview(view);
        mainView.addSubview(view1);
        mainView.addSubview(view2);
        mainView.addSubview(view3);
        mainView.addSubview(view4);
        mainView.addSubview(view5);
        mainView.addSubview(view6);
        mainView.addSubview(view7);
        mainView.addSubview(view8);

        setView(mainView);
    }
}